Winter Maintenance Clinics

We are once again offering clinics that are designed to help you keep your bike running at tip top performance. We have classes catered to all levels, whether you’ve never touched a bolt on your bike to if you’re taking your bike repair to the next level.

Doing these services can be daunting to do on your own yet expensive to have a shop do them. And it’s even more expensive if you neglect it all together. Learning to work on your own bike, even just the basics, can save you a ton of time and money. And if you know what you’re doing, it can be really fun too!

The courses will be taught by an instructor in our service center and will be hands on with the option of even working on your own bike.

Clinic Subjects

We are offering four different classes this year, which together offer a great overview of modern bicycles. These are intended to be beginner friendly yet delve deep enough into each topic to empower somebody to routinely work on their own bike. Take one if you simply want to brush up on a particular skill, or take them all if you want to learn how to do the majority of maintenance on your own.

Shifting and Drivetrain - Have you ever had a ride ruined by your shifting jumping around the whole time? This clinic will help attendees do more than just “mess around with it until it works.” You can expect to learn:

  • Derailleur Basics

    • Limit Screws

    • Tension Adjustment/Indexing

    • B-Screw Adjustment

  • Derailleur Adjustment Demo with Hands On Practice

  • Common Issues

    • Alignment

    • Cable Friction

    • Drivetrain Wear

Wheels and Hubs -   Learn how to maintain your wheels to get the most out of your bike.  Lessons on wheel truing and other maintenance that your wheels require to keep them rolling for the long term. You can expect to learn:

  • Hub Adjustment

  • Wheel Truing

    • Hands on Practice/Demo

    • Spoke Tension

    • Spoke Replacement

    • Field Fixes

Disc Brake Maintenance - Did you know that most manufacturers recommend bleeding your brakes about one a year? This course covers all of the fundamentals of hydraulic disc brakes including:

  • Brake Alignment

  • Brake Bleeding

  • Do’s and Don’ts of Brake Maintenance

Tire, Tubes and Tubeless Tires - This is a great beginner friendly class that applies to both beginner cyclists as well as seasoned veterans. Fixing a flat tire is a must know skill on the road or trail to make it home without having to call in roadside assistance. Changing tubeless tires is very much like traditional tube type tires with just a few extra steps. This We will cover:

  • Flat Repair Demo and Hands on Lab

  • Tubeless Tire Demo

  • Field Fixes

    • CO2 Inflation Demo

    • Tubeless Tire Plugs

    • Flat Repair Kit

What is the Cost?

Each class is $20, with a 25% discount for 4 or more classes. Discounts are available to enrolled NICA athletes, please email zach@zachsbikes.com for more information.

Ready to sign up?

This is a great event for groups and friends, though we are capping the maximum participants at 6 people per class. Please sign up and indicate the dates and classes you are looking to attend. We are able to tailor a class for a group if a specific topic is desired. Please email servicedepartment@zachsbikes.com with any questions.


Maintenance Classes are Back!

Who better to have servicing your bike than yourself?

After a long pause, we are finally in a position that we are able to bring our maintenance classes back! We have some great resources to make this clinics better than ever: Our new Parts Department is practically tailor fit for these classes, with awesome meeting space and some great displays to help teach.

That’s right. We are offering clinics that are designed to help you keep your bike running at tip top performance. We have classes catered to all levels, whether you’ve never touched a bolt on your bike to if you’re taking your bike repair to the next level.

Doing these services can be daunting to do on your own yet expensive to have a shop do them. And it’s even more expensive if you neglect it all together. Learning to work on your own bike, even just the basics, can save you a ton of time and money. And if you know what you’re doing, it can be really fun too!

PTS-Logo.png

The courses will be taught by an instructor in our service center and will be hands on with the option of even working on your own bike. We are continuing to follow the Park Tool School curriculum, but we have added additional content as well as videos to help you learn more. We are no longer requiring purchase of the book, but it is still a valuable resource.

Clinic Subjects

While we have offered various specialized classes in the past, we are simplifying our offerings for this year. If you wish to take a class in a more specialized topic (like suspension, wheel building, or more), please contact us at servicedepartment@zachsbikes.com. We require a minimum number of attendees, so bring a friend!

Shifting and Drivetrain - Have you ever had a ride ruined by your shifting jumping around the whole time? This clinic will help attendees do more than just “mess around with it until it works.” You can expect to learn:

  • Identification of the parts of your drivetrain

  • Setup and Adjustment of rear derailleurs

  • Hands on practice with instructors including your own bike

  • Troubleshooting shifting issues

Brake Bleeding & Maintenance - Did you know that most manufacturers recommend bleeding your brakes about one a year? This course covers all of the fundamentals of hydraulic disc brakes including:

  • Brake Alignment

  • Brake Bleeding

  • Hands on practice on your own bike

  • Do’s and Don’ts of Brake Maintenance

Tubeless Tires - This is a great beginner friendly class that applies to both beginner cyclists as well as seasoned veterans. Changing tubeless tires is very much like traditional tube type tires with just a few extra steps. This is a must know skill for being able to fix a flat tire on the road or trail without having to call in roadside assistance. We will cover:

  • Wheel Removal and Installation

  • Tire Removal and Tube Installation

  • Common Tire issues

What is the Cost?

For this year we are trying to make this class as accessible as possible. We are asking for a suggested donation of $20 to either the Klamath Trails Alliance or our local NICA Team, the Jackalopes. We are able to take donations in store through the donation box, or simply via credit card through our system.

Ready to sign up?

You can stop by Zach’s Bikes at 831 Main st, or give us a phone call at 541-851-9200. Or just send us an email letting us know which course you would like to take and when. This is a great event for groups and friends, though we are capping the maximum participants at 6 people per class.

We will post the days and times on our Event page.


May is Bike to Work Month!

As someone who has been cycling for as long as I can remember, I like to think of myself as a cycling enthusiast and possibly somewhat of expert as it pertains to riding bikes.   Over the last 50 years (yikes), I have biked to school, to my friends’ house, biked to work, biked to store, biked to restaurants, and even to the movies

The obvious reason to choose to go by bike vs. car.  Bikes are good for the environment, they don’t pollute or consume fossil fuels.  Going by bike can reduce your monthly fuel bill, automobile maintenance, and extend the life of your car.   You may even be able to reduce your auto insurance, with the reduced annual mileage.  Less obvious advantage of commuting by bike is it can sometimes be faster to than by car or public transportation, as finding parking is not an issue, and bike lanes keep you out of waiting in traffic.

I ride all year long, When my daughter was younger, I would take her to preschool by bike trailer, and then on a tandem when she got older.   Later, she would ride her own bike to school.  Over the last 15 years,  I would say that I have gotten pretty good at getting around by bike, enough to provide some advice and possibly a little inspiration.

Going by Bike Essentials / Best practices

  • A bike – any bike in good working order, that fits you properly. 

    • Test ride your bike several days before your first ride, to see if your bike needs repair.

    • Check your tires to make sure they don’t have a flat.    

    •    If your bike has been in the garage for a long time sitting idle, most likely it will need some adjustments, part replacements (tubes, tires, brake pads, worn chain).  Not sure what to look for?  Zach’s Bikes will do a free bike inspection to let you know what if anything is needed to get your bike running safely.

    • Minor changes in seat height and a new bike seat can make a big difference.

  • Ability to carry stuff

    • Backpack/messenger bag

    • Rear rack and/or front rack to allow you to carry panniers (bike bags) and/or basket (carrying your stuff off your back, is easier, and will reduce your sweat level)


  • Safety Gear – essentials (I never ride without these):

    • Helmet – If you crash, protecting your head is a good thing.  To quote my mom, “accidents are never planned”.   Did you know that Oregon state laws requires helmets for riders under the age of 16 years old?

    • Lights - front and rear red blinking lights - ALL the time!   Choose “daytime” running lights that are designed to be seen from far distances during the day.  I recommend choosing rechargeable, to reduce the need for constant battery replacement.

    • Visible clothing and accessories – daytime = bright colors/ nighttime= reflective features.  Did you know that you are more noticeable if these visible elements are moving?   Tires and pedals with reflective features get noticed when moving.

    • Bell – Use that bell to make sure pedestrians, other cyclists, even cars hear you.

  • Flat Prevention

    • Keep tires inflated at the suggested air pressure listed on your tire

    • Replace worn or weather checked tires

    • Flat repair kit - Extra tube/tube patches/tire levels/small pump or CO2 cartridges

  • Multi-tool for quick adjustments - Bicycles are simple machines and basic tools can really bail you out of common problems.

  • Lock – ALWAYS lock your bike if unattended for any amount of time.   It takes less than 30 seconds to ride off with your bike.   Lock your bike in a visible place. 

  • Fenders – a nice to have to keep dirt and road grind off your clothes.    If there is moisture on the road, it will find its way on to your clothes, and will keep your bike cleaner.

Safety

  • ·Plan your route ahead of time – use Google Maps directions and select the bicycle icon for a bike appropriate route.  If you have to ride on the road, choose roads that have less traffic.

  • Be visible!  Most accidents occur because the other party didn’t see you (see Safety Gear – in previous section)

  • Bicycles are vehicles and share the same laws as cars.  

    • Ride in direction of traffic!   Cars when entering the road, look at the direction that cars are going.   They don’t look in the opposite direction.

    • Riding on the sidewalk isn’t always the safest option on busy streets.  Drivers don’t see or expect bikes riding at high speeds

    • Obey traffic laws – stop signs, traffic lights, traffic direction.

  • Assume cars do not see you.   I always look to see if the driver sees me by waving hello, or a simple smile to establish eye contact and recognition.

  • Be predictable; use hand signals to signal turns and stopping.

How to make commuting by bike a lifelong habit

  • Set a small obtainable goal; try to replace car trip a week.  Replace car trips less than 3 miles.

  • Commute by bike part of the way – this is ideal if you need to drop off kids at school or to avoid dangerous roadways, or you have a long commute.   Bring your bike with you, then park your car, and ride the rest of the way.

  • ·Try riding a pedal assist E-bike.  These can make a longer commute faster, less sweaty, and assist with you when your route involves steep hills and challenging headwinds.   You  get the benefits of riding a bike, with less fatigue, allowing you to ride faster and/or longer than a traditional bike.

  • Commute on the weekend, ride with the family, make it a fun outing – a perfect way to try out riding as a transport option, when there is no time constraints and less traffic to worry about.

    • Ride to brunch

    • Ride to the park/playground

    • Ride to get frozen yogurt

    • Ride to Church

    • Ride to the Grocery Store

    • Ride to your kids’ sporting event

Other Benefits to Commuting by Bike

  • Cycling is great exercise

  • Arrive at work refreshed and full of energy

  • A way to destress and decompress after work

  • Easier to turn the ride home into a recreational ride by extending your commute. Take a detour through Moore Park’s mountain bike trails or take the OC&E trail as the long way around.

  • Feeling of accomplishment that you got in some exercise and did something good for the environment.

  • It can remind you of the time when you were younger, when you rode your bike because it was fun and symbolized your first feeling of independence.

ZBikes service intake procedures, the value and importance.

At Zach’s Bikes we understand that your bike can be a source of pride. It can be relied on for miles and miles of enjoyable recreation. It may even be part of your training program for that upcoming race. There are many reasons why you could point to your bike and proudly say “That’s my bike”.

20200214_201554699_iOS.jpg

When you come in for service at Zach’s Bikes, weather you made an appointment online, called ahead or just stopped by, we will show that same level of pride in your bike. That is why we recommend having a thorough and complimentary inspection done on your bike. Our inspection process takes the guess work out of repairs. It will give you a complete picture of the condition of your bike. Often times avoiding costly future repairs by maintaining your bike rather than waiting until it needs more involved repairs. While you wait in our comfortable waiting area, take advantage of our complimentary Wi-Fi while watching TV and sipping on a crisp cool soda. Or mosey up to the bar and watch the techs perform their mechanical wizardry. Once your bike inspection is complete one of our technicians can discuss it with you and go over any concerns that you may have. You can then have the inspection emailed or printed and we will save a copy in our records.

20200214_195214461_iOS.jpg

Whether you are getting your first bicycle inspected by our service department or you are a longtime, loyal customer of Zach’s Bikes, you will receive the highest level of service from our friendly staff. Our well-trained and friendly technicians will ensure that your bike is serviced with high-quality components using the latest service procedures.

20200214_200633704_iOS.jpg

Making a name in the industry, we have earned the valuable trust of thousands of Oregonians over the years. By presenting the overall condition of your bike through your bicycle inspection, we have put the control of your bikes service plan back in your hands.

If you are interested in finding out more about having your hydraulic brakes or suspension serviced, these articles will get you on the right path.

Zachs Bikes Logo_Final square.jpg


Brake Service. When and Why?

Bikes have come along way. The technology found on modern bikes more closely resemble the components found on motorcycles or even your car! Because of this, the procedures used to maintain bicycles have also changed. One of the most important systems on your bike is the braking.

20180729_143754.jpg

Your brakes likely use a set of brake pads, that are controlled by your brake lever. More and more we are seeing disc brakes on most bikes. These types of brakes use a disc brake rotor mounted to the hub, instead of the brake pads rubbing on the rim surface. Because of the increased power along with other factors, disc brakes have made their way onto every type of bike.

When taking care of disc brakes, you will want to make sure that the brake pads and rotor are in good condition. Generally, the brake pad material should be no thinner than a dime (see picture below). If your pads have worn beyond this point, then pad replacement is recommended. Inspecting your rotor can be a little bit tricky, but with a few basic checks this also can be done quickly and easily. When looking at the surface of the rotor, if there is a “ridge” or a difference in the thickness of the rotor where the brake pad rubs, then the rotor should be checked with a micrometer to get an exact measurement (see picture below).

IMG_0453.JPG
IMG_0451.JPG

Next comes your brake fluid. “Wait. My brakes have fluid in them?” While there are disc brakes that use a cable. The majority of disc brakes use fluid that is inside of the brake hose. This fluid is what makes your brake lever able to control your brake caliper, as well as making your brakes much more powerful than rim brakes. Just like on your car, this fluid needs to be changed regularly. Having this fluid flushed on a yearly basis is a good rule of thumb. If the fluid is not changed then contamination, fluid break down and air will tend to make the brakes not work properly, or even cause internal damage.

Having your brakes serviced regularly will help prolong the life on one of the most important components of your bike. Since this is a regularly recommend service, some home mechanics will take care of this on their own. If you’re curious about working on your own brakes, we highly recommend taking one of our courses to give you the foundation and tools to start servicing your own brakes. Or you can call 541-851-9200 to make an appointment with us to get your brakes in peak condition and ready to take on another season of riding.

Still have questions? Check in with Aaron, aaron@zachsbikes.com

Or follow along as Sram/Avid or Shimano take you through your brakes step by step.


Suspension Service, When and Why.

"Why would I service my suspension? It is working fine."

20170130_145454.jpg

Your suspension does a lot when you’re riding down that rough trail. To keep it working properly, like most things it needs maintenance. But how often do I need to service my suspension?

Unfortunately, there is no simple answer. Everybody rides differently. Over time the performance degrades, contamination gets in, and parts that aren't supposed to wear out, do. Fortunately, the suspension manufacturers give us guidelines.

ROCKSHOXserviceinterval.jpg
Fox service intervals.png

Fox and Rockshox recommend "Basic" maintenance and "Full or Advanced" maintenance for both shocks and forks. Basic maintenance can often be performed by the rider. This involves changing the air can oil and seals on a rear shock. The fork is a little more involved, but not bad. Removing the fork lowers and changing the lubrication oil and seals will cover the "Basic" also known as the 50-hour service. This service is going to keep your suspension working great and extend the life of your fork and shock.

We even offer courses that will have you servicing your own suspension in no time. All with the help of our professional in-house suspension service technician. Click Here for more information on our service courses.

IMG_20181026_172924_586.jpg


What is the difference between the "Basic" and "Advanced" service? The advanced service dives much deeper into the inner workings of your suspension. Fox recommends having this service done every 125 hours or yearly. Whichever comes first. While Rockshox recommends every 100 - 200 hours depending on the model of fork and shock. These intervals can be shortened if the bike is ridden very aggressively or in harsh conditions. For example, it would be a good idea to service your suspension after several weeks bombing the gnarly trails of a bike park. In addition to the procedures found in the basic services, the advanced service includes a full tear down, cleaning, inspection and reassembly of the air spring, adjustment knobs, damper assemblies and damper fluid. Most shops for this service, will send your fork or shock into the manufacturer to have performed. This can take weeks, especially when the manufacturer is backed up. However, we will take care of your Rockshox and Fox service right here in Klamath Falls, and you can talk with the person who is working on your bike.

20181026_085305.jpg

Having your suspension serviced regularly will help prolong the life on one of the most expensive components of your bike. If you’re curious about working on your own suspension, we highly recommend taking one of our courses to give you the foundation to start servicing your own suspension. Or make an appointment with us to get your suspension in peak condition and ready to hit the trails.

Still have questions? Check in with Aaron, aaron@zachsbikes.com

Or follow along as Rockshox or Fox take you through your suspension step by step.


Park Tool School is back for 2020. With new classes: Hydraulic Brakes, Suspension Forks and Shocks.

PTS-Logo.png

Who better to have servicing your bike than yourself?

That’s right. We are offering clinics that are designed to help you keep your bike running at tip top performance. We will be covering topics from the basic tune-up adjustments to the preventative maintenance items you should be doing on a yearly basis. We have classes catered to all levels, whether you’ve never touched a bolt on your bike to if you’re taking your bike repair to the next level.

Doing these services can be daunting to do on your own yet expensive to have a shop do them. And it’s even more expensive if you neglect it all together. Learning to work on your own bike, even just the basics, can save you a ton of time and money. And if you know what you’re doing, it can be really fun too!

DSCF4548.JPG

The courses will be taught by an instructor in our service center and will be hands on with the ability to work on your own bike. With the tools and knowledge that you will receive at these courses your brakes, suspension fork and shock will be a joy as well as a source of pride to ride.

Clinic Subjects

Park Tool School General Bike Repair Classes $155 - You will receive instruction and hands on training on a broad range of topics including flat repair, derailleur adjustment, brakes and wheel truing . This class is broken up into two levels based on your experience with cycling in general (not necessarily your mechanical aptitude). The beginner course is recommend for the occasional rider who just got into the sport and are wanting to learn the most fundamental workings of their bike. The intermediate course is for people that have started riding somewhat regularly and are looking to start to do some of their own mechanic work (a beginner would be fine in this class but may cover topics that aren’t needed). Both classes are offered as either a weeknight series over several weeks, or a single weekend afternoon/evening. The price of the class includes the book which you get to take home, and you get to work on your own bike.

Shimano Brake Bleeding $100 - You will receive instruction and hands on training performing the manufacturer recommended maintenance schedule to bleed your brake yearly. The price includes the Shimano Bleed Kit, Shimano Bleed Block for your model of brakes and Shimano Mineral Oil that you get to take home with you. You will be performing this service on your own bike in class, which would normally cost you $68.

Sram/Avid Brake Bleeding $145 - You will receive instruction and hands on training performing the manufacturer recommended maintenance schedule to bleed your brake yearly. The price includes the basic Sram Bleed Kit (which has bleed blocks, fluid and the rest required tools). You will be performing this service on your own bike in class, which would normally cost you $74.

*Note: SRAM/Avid brakes bleed significantly different and require very different tools than their Shimano counterparts. If you need help identifying what you have please contact us. Tip: take a picture of your brakes and we can easily sort out what tools you need.

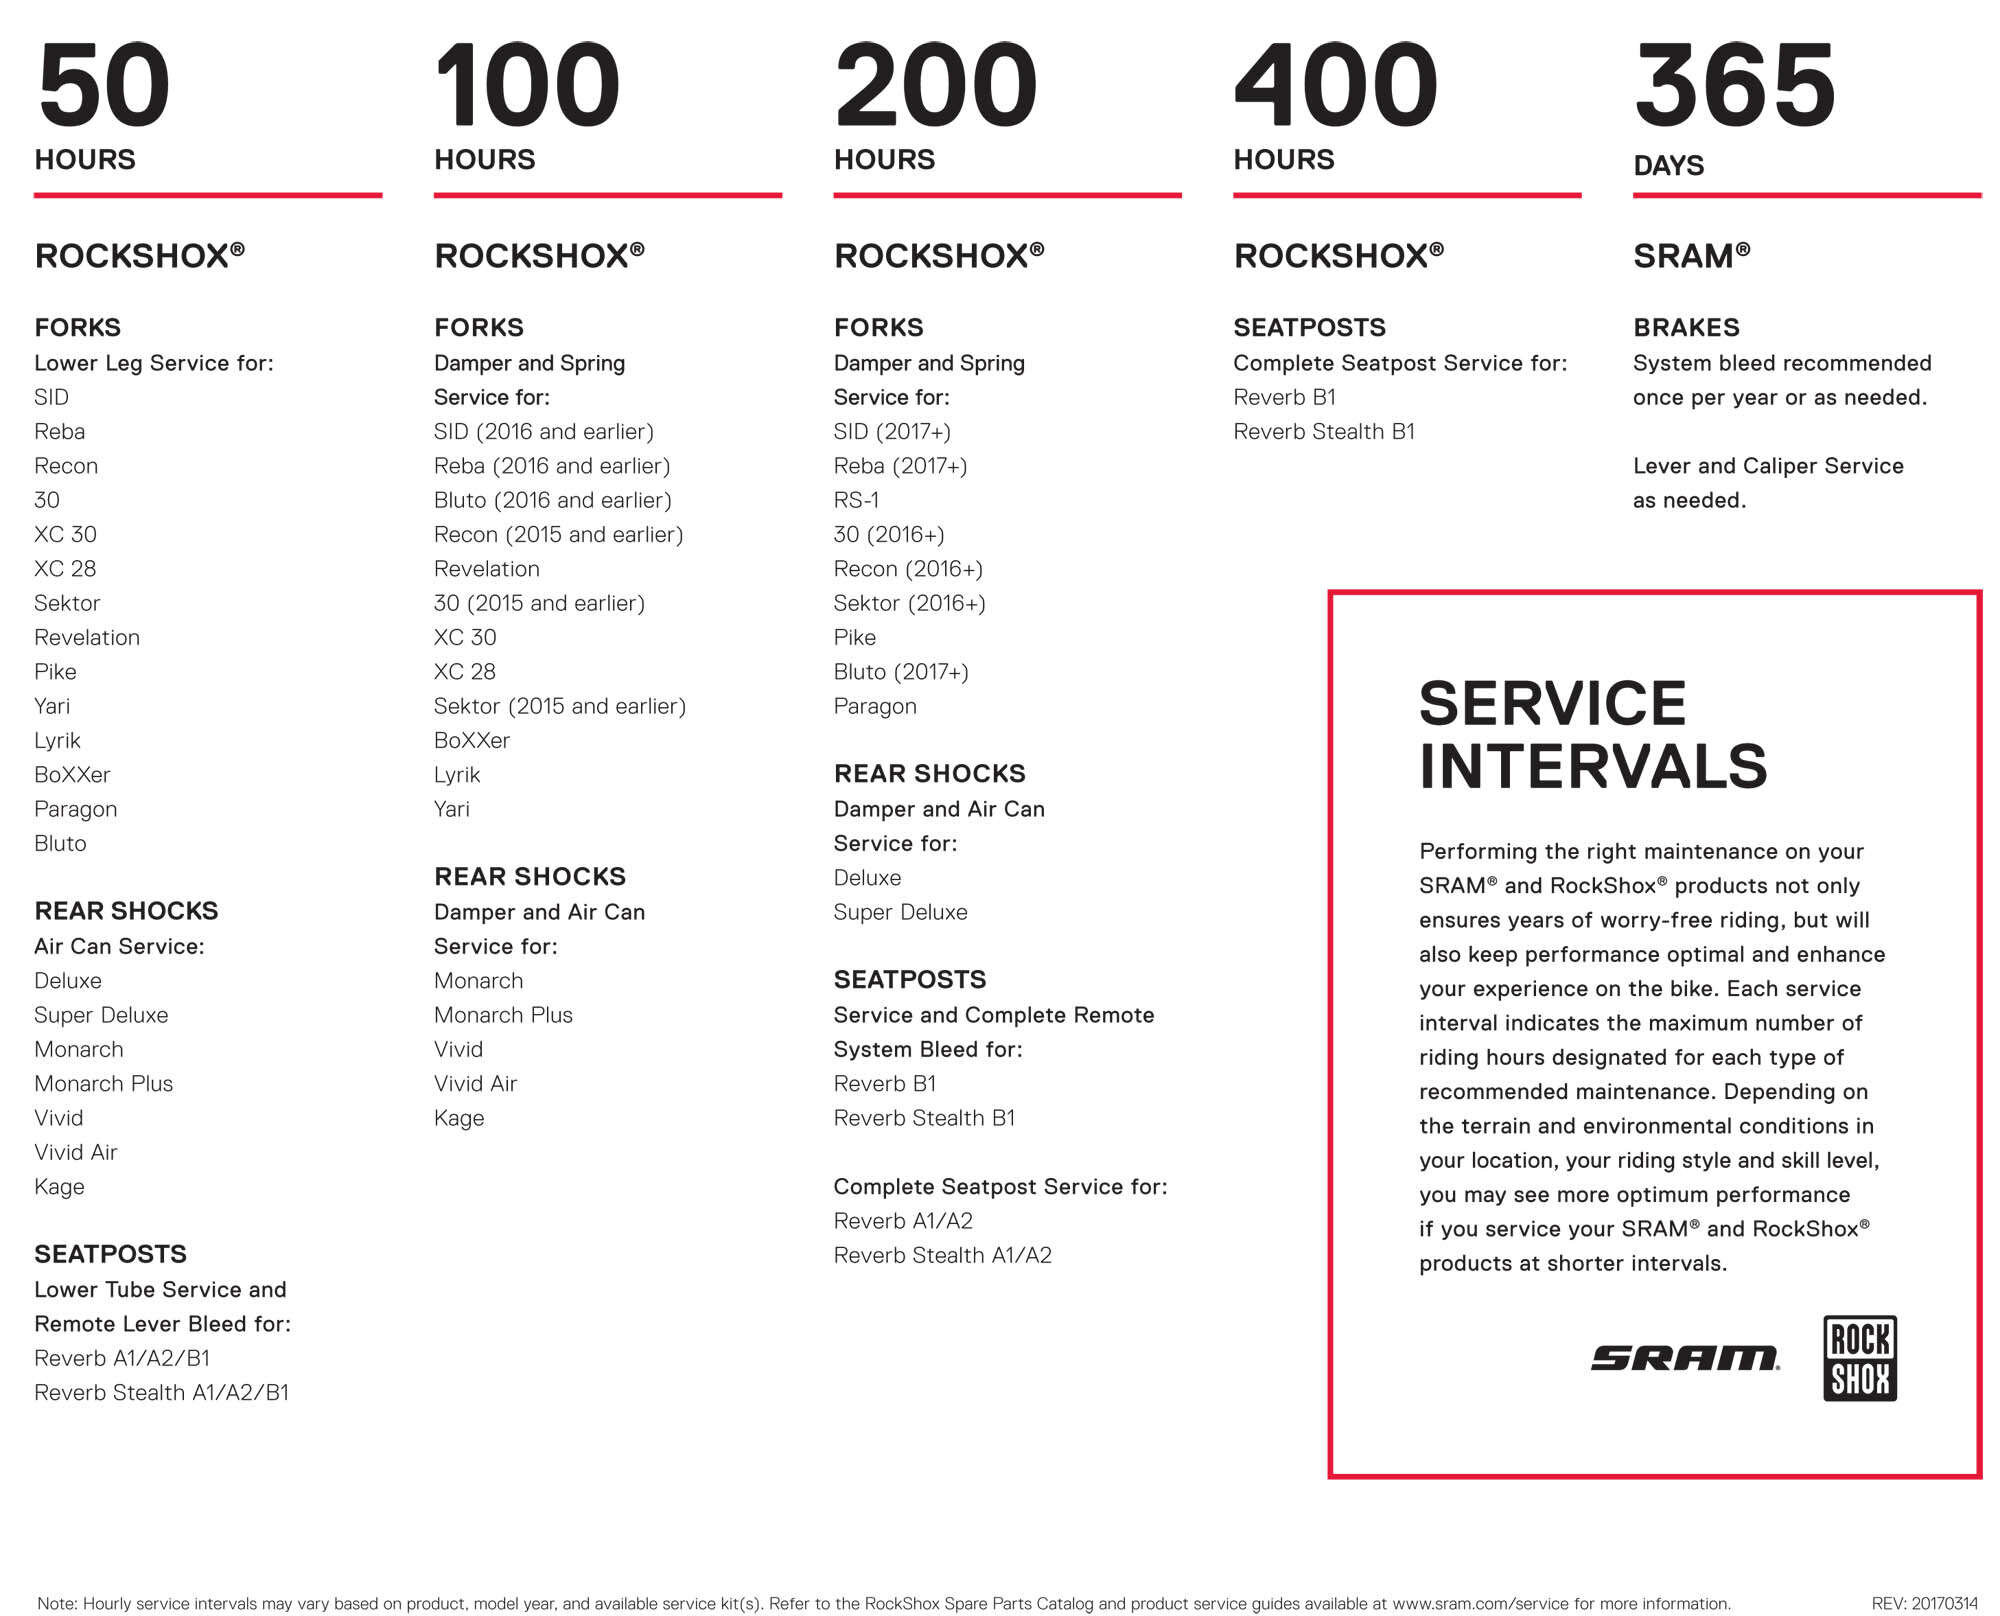
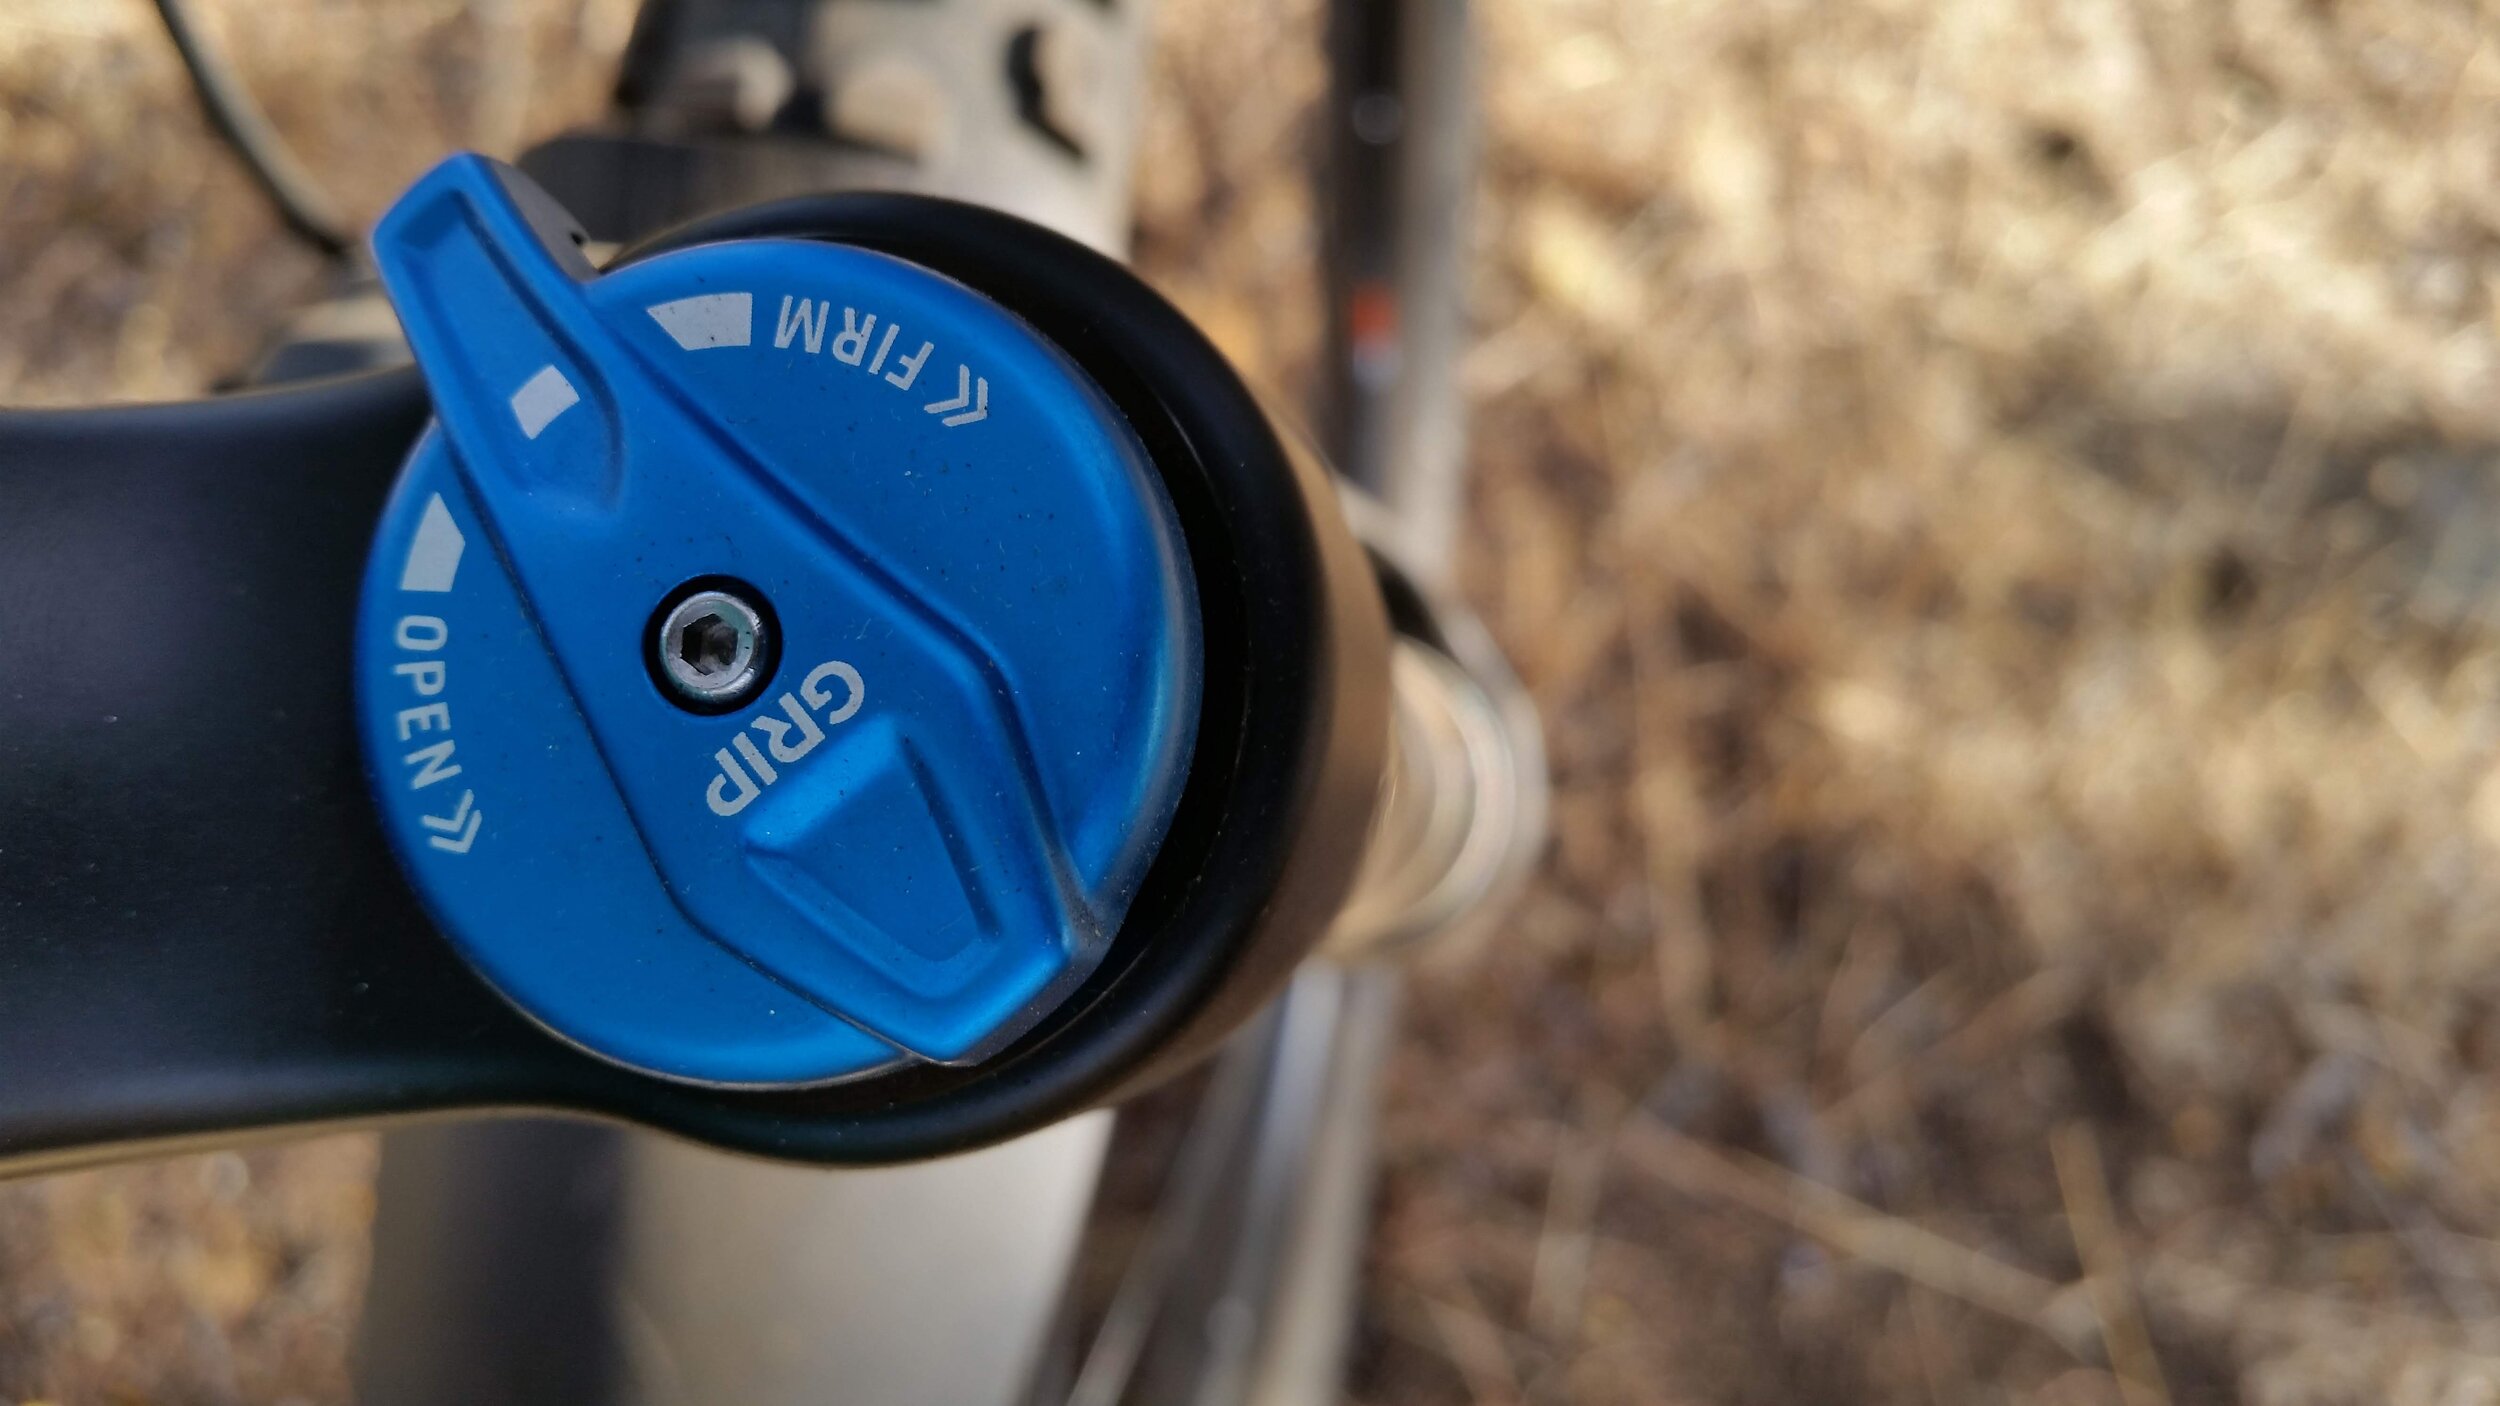
Fox/Rockshox Fork Service $140 - You will receive instruction and hands on training performing the manufacturer recommended maintenance schedule to perform a basic service yearly. The price includes a fork seal driver, seal remover and the seal kit and oil specific to your fork. You will be performing this service on your own bike in class, which would normally cost you about $75-85.

Fox/Rockshox Shock Service $60 - You will receive instruction and hands on training performing the manufacturer recommended maintenance schedule to perform a basic service yearly. The price includes a seal kit and oil specific to your shock (not very many special tools are needed for this service). You will be performing this service on your own bike in class, which would normally cost you about $50-60.

*Note: Seal kits and oils vary wildly between different models and brands. Please bring in your bike, or at the very least pictures (if you can get the serial number that helps a lot, sometimes it’s the only way to truly identify it) so we can identify the parts you need and have them ordered and ready for your class day.

Ready to sign up?

You can stop by Zach’s Bikes at 831 Main st, or give us a phone call at 541-851-9200. Or just send Aaron an email letting him know which course you would like to take and when (this is the email you can send pictures of your components to so they can be identified). We’re happy to customize any of our courses if you provide two or more people to an empty class, please call for availability.

Park Tool School General Bike Repair Classes -

  • Saturday, January 4th, 3:00 pm to 8:00 pm. Intermediate

  • Thursday, January 9th, 23rd, 30th 5:30 pm to 8:00 pm. Beginner

  • Saturday, January 11th, 3:00 pm to 8:00 pm. Intermediate

  • Saturday, January 18th, 3:00 pm to 8:00 pm. Intermediate

  • Saturday, January 25th, 3:00 pm to 8:00 pm. Intermediate

  • Saturday, February 1st, 3:00 pm to 8:00 pm. Intermediate

  • Thursday February 6th, 13th, 20th, 27th 5:30 pm to 8:00 pm. Intermediate

  • Saturday, February 8th, 3:00 pm to 8:00 pm. Intermediate

  • Saturday, February 15th, 3:00 pm to 8:00 pm. Intermediate

  • Saturday, February 22nd, 3:00 pm to 8:00 pm. Intermediate

  • Saturday, February 29th, 3:00 pm to 8:00 pm. Intermediate

  • Thursday March 5th, 12th, 19th, 26th 5:30 pm to 8:00 pm. Intermediate

  • Saturday, March 7th, 3:00 pm to 8:00 pm. Intermediate

  • Saturday, March 14th, 3:00 pm to 8:00 pm. Intermediate

  • Saturday, March 21st, 3:00 pm to 8:00 pm. Intermediate

  • Saturday, March 28th, 3:00 pm to 8:00 pm. Intermediate

Brake Bleeding and Suspension Classes

We are leaving our schedule somewhat flexible on these classes due to the varied demand. Once one person signs up for a class that is the topic we are covering that day. Any empty classes are totally up for grabs. Each class has room for two people only. Please call or stop by for availability. You must allow at least 3 business days before your class starts from when you sign up so that we can get you the proper tools and parts for your system.

  • Saturday, January 4th from 9:00 am through 11:30 am.

  • Wednesday, January 8th from 5:30 pm through 7:30 pm.

  • Saturday, January 18th from 9:00 am through 11:30 am.

  • Wednesday, January 22nd from 5:30 pm through 7:30 pm.

  • Wednesday, January 29th from 5:30 pm through 7:30 pm.

  • Saturday, February 1st from 9:00 am through 11:30 am.

  • Wednesday, February 5th from 5:30 pm through 7:30 pm.

  • Wednesday, February 12th from 5:30 pm through 7:30 pm.

  • Saturday, February 15th from 9:00 am through 11:30 am.

  • Wednesday, February 26th from 5:30 pm through 7:30 pm.

  • Saturday, February 29th from 9:00 am through 11:30 am.

  • Wednesday, March 4th from 5:30 pm through 7:30 pm.

  • Wednesday, March 11th from 5:30 pm through 7:30 pm.

  • Saturday, March 14th from 9:00 am through 11:30 am.

  • Wednesday, March 25th from 5:30 pm through 7:30 pm.

  • Saturday, March 28th from 9:00 am through 11:30 am.

You are not signed up until you have been confirmed either in person or through a response via email. We will be cancelling any class with 1 or fewer people signed up for it, but we will make an effort to try to fill that class or reschedule as best as we can. Please email Aaron with any questions.


3 Places to take the family on a fun bike ride, right here in Klamath Falls. 

thumbnail_20190618_123319.jpg

What are we going to do this weekend? This may be the question your family is asking Friday afternoon. Well here are 3 great places to take the family for a ride that everyone can enjoy. 

All of these routes are beginner friendly, making them a joy for the whole family. So strap on your helmets and enjoy the the great outdoors right here in your own backyard. 


- More Park is a real gem of a trail system, right here in downtown Klamath Falls. Not many places have such great trails so close to town. Which makes it that much easier to get out and enjoy. The route below will take you through meandering trails in the forest above Moore Park where wildlife abounds. Deer, squirrels, and maybe even the local Moore Park fox will be your constant companions on this ride. Once you have come out of the trees the views open up to reveal Klamath Lake. On Wednesday evenings you will even be able to watch the local Yacht club sailboats as the sun sets in the back ground. Find out more details about the route here.

thumbnail_20190618_120751.jpg

- The Spence Mountain Trails are some of the most exciting new trails in Oregon, and they are just down the road! The Shoalwater Bay loop is just what the family needs, when you want to get that feeling of being away from it all, without having to drive to the middle of nowhere. The trail starts from the Shoalwater Bay trail-head located just 1.5 miles off of Hwy 140 on Eagle Ridge rd. Here the trail gradually climbs for 1.5 miles, offering glimpses over Shoalwater Bay of Klamath Lake. Once you get to the top, catch your breath then get ready for a fun flowy ride down the second half of the Shoalwater Bay trail. At the waters edge you will meet the Old Eagle trail for a relaxing cruise back to the trail-head. Along the way enjoy the Pelicans in the bay, the cranes on the shore and the amazing views of Mt Mcloughlin. Find out more details about the route here.

thumbnail_20190618_122621.jpg

Looking for more great rides? Check out more options at Zachsbikes.com in the "Ride Klamath" tab. 


- The Link river trail is a great trail even for youngster on "run bikes" (bikes without pedals). You can start from the north trail-head across Oregon ave from Putnam's Point. The packed gravel surface is great for riders of all skill levels. All along the way you will have views of the Link river, with opportunities to go right to the waters edge. There you can watch the rapids, birds of all sorts and stop to have a picnic. The trail is mostly flat, with a slight downhill at about a mile in. So if you have little ones, coming back up the hill may be cause for a short walk. The entire trail is 1.5 miles long, and ends at a paved parking lot near the Favell Museum. Find out more details about the route here.


Klamath River Ride

IMG_20180423_105703.jpg

Last April I found myself a window of opportunity to go on a big ride from town. The snow had melted, the weather forecast predicted sunny and I had 3 days off. That week I decided to ride to the coast from Klamath Falls following the Klamath River. My end goal was Crescent City because there’s a shuttle that goes back to Klamath Falls.

This is great route for those on tour looking for a good way to get to the coast from Klamath Falls or those looking for a good multi-day/overnight ride.

20180423215739.JPG

Things to know

  • Terrain is mix of paved, gravel, and dirt roads.

  • Navigation is easy, because for the most part you just follow the river.

  • The views are great along the river and there are plenty of camping opportunities.

  • Be sure to bring along plenty of food. The first stop for resupply without going to far off route isn’t until Seiad Valley (about 110 miles from Klamath Falls)

The Ride

Topsy Grade Road will be the first big hurdle, you are greeted with gravel climb right of the bat and a pretty hairy descent on a rough road. You will be on gravel and dirt roads until you pass Iron Gate Reservoir. The trip once you get to Copco Lake is pretty gentle.

Happy Camp is about the half way point of the route and will have few restaurants, a grocery store and lots of Big Foot related paraphernalia to look at.

20180423215558.JPG

The second very big hurdle happens when you have to leave the Klamath River the road following the Klamath River will end as you get closer to the Yurok Reservation, so you will want to get on Bald Hills Road before then. This will is a long climb about 2600 feet in under 6 miles. At the top you will be met with some gorgeous views and the paved road switches to gravel for a bit and then back pavement as you descend through the Redwoods.

From here jump onto HIghway 101 North and then go into Prairie Creek Redwood State Park and then back onto 101 towards Crescent City.

For bonus points if you want to get the full Klamath River Experience maybe consider rafting the last section of the Klamath River into the Ocean.

Let me know if you have any questions on the route. Feel free to email me at kyle@zachsbikes.com

The Interview: With Anthony and Aaron, Comparing the Trek Remedy with the Trek Slash 29. Which one is for you?

20171008_124356_6.jpg

The Interview With Anthony and Aaron,

Trek Remedy vs Trek Slash 29

Which one is for you?

20171027_101103.jpg

To compare the Trek Slash with the Trek Remedy, we took two different riders who each ride these long travel trail machines, and had them switch bikes. Then asked for their thoughts.

Anthony, who you may have seen in previous posts as well as his Instagram take-over of Zach's Bikes in Oakridge, is an advanced level mountain biker, with his focus towards the downhill. He rides the Trek Remedy size 18.5", a crusher of a 160mm travel machine rolling on 27.5" wheels, customized to match his style.

Then there is Aaron. You may have seen him wrenching on a bike in the service area of Zachs Bikes. Aaron is also an advanced level mountain biker, with an eye for the downhills. He rides the Trek Slash 29 size 17.5", 160mm travel big wheeled enduro bike, which Pinkbike recently said is " a potent weapon out on the trail".

Which is your favorite trail and trail feature in the area? 
 

Anthony: Honestly, probably North Ridge, and the jump section about halfway down. Yeah North Ridge is so fun.

Aaron: I'd say Northridge out on Spence. That trail will keep you awake, for sure. If I had to choose one feature, it would be a small table-top to step-down on Hooligan. Front tire tapping that is super fun.

What are your strengths?

Anthony: Jumping... Is that a strength?

Aaron: Rocks. I love riding rocks fast.

What are your weaknesses?

Anthony: Um. I'm getting better at it, but probably corners. Sorry, I'm the worst interviewee. I'd say my other weaknesses are the Slash 9.8 and climbing.

Aaron: Climbing for sure. I just want to be at the top! And high fives, I'm horrible at those.
 

Photo Nov 23%2c 3 58 40 PM.jpg

What do you love about the bike that you regularly ride?

Anthony: I love that it's quick and responsive. It feels like less bike when your in the air. It can take turns quicker and its definetely poppy. You can play around on it more than the Slash.

Aaron: I really like how well it is glued to the ground. If you can commit to a line that bike can handle it. Just point it where you want to go, and it'll take you there.

What changes have you made to your bike?

Anthony: A new Ergon saddle. New bars, I got the Chromags and new grips. And a longer dropper post.

Aaron: Custom built carbon wheels. I tend to destroy wheels. I put on narrower bars, and a smaller chainring to ease my phobia of climbing. Then just some green parts just for color.

Photo Aug 07%2c 5 25 56 PM.jpg

When you switch bikes, what was the first thing you noticed?

Anthony: Definetely more plush suspension. With a longer wheelbase and a shorter cockpit. 

Aaron: How quickly that thing cornered. It turned way faster than the 29 inch wheels. And how poppy it was, now I can see how Anthony jumps so stinking well!

Were you instantly comfortable or was there a learning curve?

Anthony: Instantly comfortable. I kinda wanted to take it home. It felt like it would soak up everything.

Aaron: I took me a few minutes to figure it out. But after going through a few corners and jumps, it felt really good and responsive. 

Photo Nov 23%2c 3 37 06 PM.jpg

What would you say is the strength of the bike you tried?

Anthony: Charging downhill on rugged trails. Downhill is where it reaches the maximum limit of awesomeness. I didnt think the 29s would make that much of a difference. But it took less effort to keep momentum. I felt more locked in even on the corners.

Aaron: It keeps you more in touch with the trail. You get the feedback from the terrain, and that lets you work with the features a bit more. Rather than just mowing over them and not really even noticing.

What was your favorite part of trying out a similar but different bike to what you regularly ride?

Anthony: It was helpful in seeing what I like as a rider. The Remedy is a blast! I think you have to figure out what style of rider you are.

Aaron: I enjoyed getting the hands on feel for these bikes. Because on paper these bikes are very similar. But on the trail, they are two very different bikes.

Photo Sep 29%2c 8 13 48 AM.jpg